Thursday, July 12, 2012

Fanny Has Wings!

Tuesday, I ScotchBrited all of the components for the vertical stabilizer (VS). After that, I cleaned all the parts with acetone then primed everything. I then realized that I forgot to dimple the necessary parts BEFORE priming. It's ok though, the primer stuck very well. I'll get into a routine eventually. So far, I really am impressed with the SEM product. After the primer was dry, I set a few rivets into the VS-803PP and VS-808PP parts. I cleco'd on the VS-410PP, -411PP and -412PP and called it a night.
One Side of the Inside of VS Skin Scuffed
Ribs & Spars & Doubler, Scuffed,
Cleaned & Ready for Primer
HOBBS Meter - 52.7 hrs

Wednesday saw me arrive home at about 10am in anxious anticipation of the arrival of my wings! Fanny (the empannage) now has wings! While I was waiting, I dimpled the parts I had forgotten to dimple before priming. The delivery came and the driver backed into my driveway and helped me unload the two crates and move them into the garage. The heavier of the two (204lbs) was 15' in length so it takes up a little of the walking area in the back of my garage. No worries. Once I get the two crates inventoried, I'll be able to take the wing spar and relocated it for storage and clear up some needed work space. I went back to work after the extended lunch and in the evening, finished the rest of the dimpling with the pneumatic squeezer as they were not reachable with the DRDT-2. After all parts were dimpled and double-checked for any forgotten holes, it was on to clecoing and riveting. After I had set a few, I realized that a few of the flush rivets at the bottom of the rear spar had not been cleanly set, leaving a few sitting proud. I finished setting the rest of the flush rivets and called it a night after 2 hours for the day and decided to drill (too late now, noise abatement) about 5 out on Thursday.
W I N G S !!! !!! WAHOOOOO!!
Finishing the Dimpling I Missed Earlier
HOBBS Meter - 54.7 hrs

Today (Thursday, July 12) I drilled the few rivets that I wasn't pleased with and reset them with no further issues. Next I was on to finish riveting the rear spar of the VS. All went well with about 2 or 3 drill-outs. They are becoming fewer and less often as time goes on! :) I finished the rear spar and moved on to the forward spar and by clecoing the ribs on and riviteng as I went. Here, you are to rivet VS-704, -705, -706 and -707 to the forward spar.
Rear Spar Completed Awaiting Installation
As I'm working in the 88° heat in the garage (it's been over 100° the last few days here in the high desert of So. Cal.), I started getting bit by what appear to be these little flying ants. I got stung a couple times as well as bitten. I called it a night here as I was going nuts with the little irritants! Boy, I kept THAT clean! I'll pick up here Saturday. Tomorrow, Friday the 13th is my wife's birthday so I'm taking her out for the day to celebrate. I may get back into the garage in the evening, depending on the little dive-bomber's activity that I experienced. Either way, finishing the assembly of the VS should go relatively quickly. I need to get to inventorying the wings! You only have 30 days to inspect and inventory for correctness, otherwise it's on you for any missing parts of incorrect issues. That's it for now. I just want to get this posted tonight. I'll upload pictures in a couple days so you have reference for some of the dialog. Take Care and Thanks for Reading!
HOBBS Meter - 56.3 hrs

Sunday, July 8, 2012

Vertical Stabilizer Started!

I started assembling the veritcal stabilizer (VS) today. I got everything fastened together. I started with clecoing the VS-808 spar doubler to the VS-803 rear spar then added on the VS-410PP, -411PP and -412 PP hinge brackets. I then drilled the missing holes in the upper VS-410PP bracket per the plans. I prepared the ribs, VS-704, -705, -706 & -707 by fluting, edge finishing and straightening them out. Next I cleco'd the ribs to the front and rear spars then match-drilled the rear spar doubler to a #30 with the rear spar. After that, I match-drilled all rib to spar attach holes. Next came clecoing on the skin to the VS skeleton assembly, then match-drilling all skin holes except where the fiberglass caps go. I disassembled, deburred and edge cleaned. Next is to clean, scuff, clean, prime then reassemble.

I'm stoping at this point just before priming. I want to go and research lighting on the VS/rudder to see how I need to run cabling through the assembly. There is a light location on a rudder caps so I want to make sure when I run the cabling, I have everything drilled ahead of time, before priming and assembling. I don't have any pictures tonight. This is a pretty straightforward assembly. I will probably snap a few after priming and while assembling. I'll let you know how it goes and what I decided later about lighting. No VS-mounted cameras here like some folks are adding. I'll do a dash or wing cam If I really want video.


That's it for now my peeps. Take Care and Thanks for Reading!
HOBBS Meter - 51.1 hrs

Friday, July 6, 2012

Birthday Wishes & First Completion

Happy Belated, 236th Birthday United States! It's been a pretty incredible week with days at work, days off, working on my mistress, etc. I had to work Monday and Tuesday, off Wednesday for our nation's birthday celebration, back to work Thursday and off Friday.

My company has a 9/80 work week. It's confusing as heck at first but pretty nice, and you get used to us pretty quickly. The only nicer work week is the 4/10s. We basically have every other Friday off. We work a full week of 9 hour days, but on the first Friday, the first 4 hours complete the week. The second 4 (only an 8 hour day on working Fridays) are then put towards the next week. That week (the second one) I work Mon-Thurs 9 hour days then off the second Friday. The 4 hours that was carried over from the previous Friday, counts in the second week, completing the 40! Anyway, week was a weird work week, trying to get used to when I needed to go in and when I didn't.

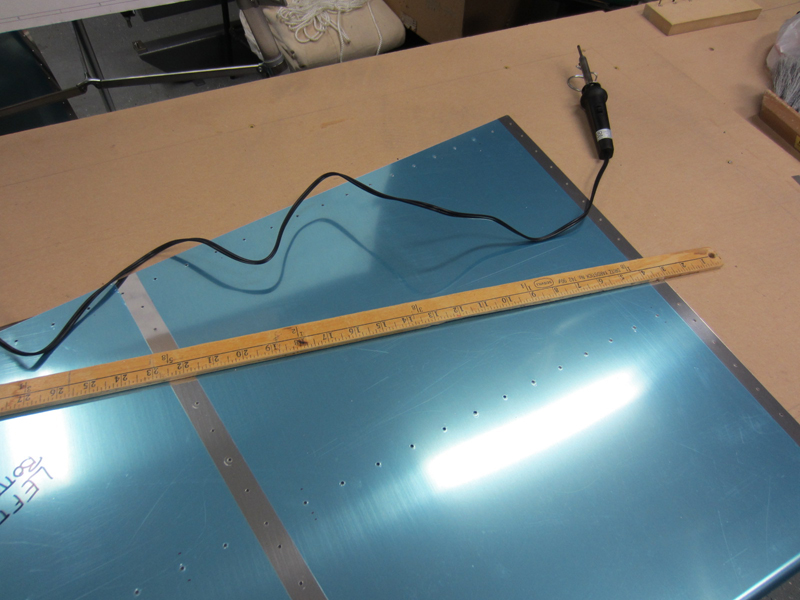
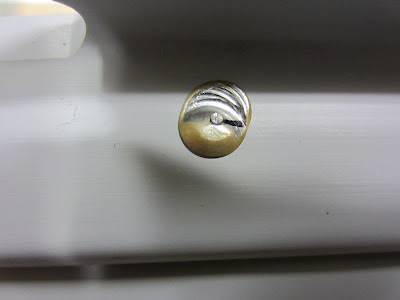
Ok, back to work. Monday saw a little rest from the project and I got back to the plane Tuesday, July 3. This looked like a pretty simple evening. all I had to do was rivet HS-710 and HS-714 reinforcement angles to HS-702, the forward spar. Well, this little chore seemed easier said than done. I struggled a bit on and off with some of the riveting. Everything seemed to be going along hunky dory. I felt good about all the rivets I bucked. Then I turned the spar on its back and BAM!! What the hell are those ugly things?

Ever Put A Smile On A Rivet? I Did!
Frowns In This Case

Yep, I wasn't paying attention to the setting of my rivet gun's rivet set on the rivets here and I think that when I did the initial buck, I put the gun down and checked the shop head with the guage tool and felt it (they) needed a little more and when I picked up the gun, it felt like I had the tool on the head. WRONG! Time to drill out some rivets. Here's the process. Be sure to LOOK and make sure the rivet gun is ON and read to go. Hope this helps other builders:
1) Secure Your Work Piece
2) Mark Your Rivet with a Marker
Then Use a Center Punch
3) Drill the Rivet on Center to the Bottom of
the Rivet Head

4) Insert a Punch Sized to the Hole
#30 In This Case
5) Snap the Head of the Rivet Off
This Exposes the Hole & the Rest of the Rivet
6) Use a Light Hammer to Punch out the Rivet
If Done Right, You'll Have a Clean Hole to Re-Rivet
Interestingly enough, I boogered the same locations, opposite of each other. I managed to buck the replacements without incident.

The next SIMPLE part of this little task was to rivet the nose and main HS-404 and HS-405 ribs. Well, hold on. Not so fast! I am starting to liken this riveting thing to my golf game. I love to play golf. I do not profess to be the greatest player. I'm the kind of golfer who knows how to play the game well enough to love to hate the game. I've never taken a lesson, save a tip or two on the practice range with the course pro walking up and down helping golfers here and there. Like drugs, the first one is free, then you're hooked to pay for the rest. Bad analogy, but it fits. That said, I play out of hazards (sand traps, the rough, out of the trees, out of the woods, etc.) quite often. Well, I've become pretty adept at getting out of hazards over the years. Riveting is, for me, a very similar process right now. Though I've had lessons in riveting, I'm no professional. I get by, for now. I check my shop heads often for height and shape to make sure they're straight and the right height. And yes, occasionally I have to "get out of a hazard" and drill one out. Like my hazard game, I'm becoming very adept at drilling out a rivet without damage to the hole, i.e., enlarging, elongating, etc. I know that in time, I'll become more adept at riveting and hopefully, forgo the need for drilling out rivets regularly. So, with that, it took me 2 hours to rivet the two reinforcement angles and the 4 ribs to the forward spar. I drilled several (I lost count) rivets out and re-riveted the same ribs a few times. Part were because I didn't set them very well to begin with and part were because I didn't follow the plans and directions carefully. At one point, I installed the HS-404 ribs without the HS-405 attached with them. They are supposed to be riveted TOGETHER! The thing that confused me was the -404 ribs only use 2 rivets for attachemnt and the -405 ribs use 4. Even with that, I was thinking in a line of 4 rivets, the front rib used the inner two rivet holes and the aft, -405 rib used the outer two. WRONG! Well, I finally got them set to satisfaction, nice and clean!
HOBBS Meter - 37.3 hrs

Wednesday, July 4, American Independence Day! - Today, I started finishing up the horizontal spar (HS) by assembling the forward spar assembly to the HS-601PP skins. This is COOL! It's finally starting to look like part of an airplane. First, I riveted the HS-707 nose rib to the top of the left skin. This is easier said than done. After dimpling the skins and the ribs, the Cleko (cleco) fasteners don't stay in the holes very well. Typically, you can get by with fastening every other hole, but in this case, I need a cleco in every hole. In addition, I needed to be a little creative with that little chore. I used a little duct tape to hold the aft part of the skin trailing edges together, along with another trick. This seemed to work pretty well. I was able to get the rib tight against the upper skin for riveting. Only one drill-out here.
A Little Trick to Get the Skin Tight
Against the HS-707 Nose Rib. No Duct Tape Here


Next, I cleco'd the end, HS-706 rib to the skin then HS-708 temporarily to the skin and the aft flange of that -708 nose rib. This helps hold that rib in place for the riveting the bottom part of the rib to the skin.
HS-707 Nose Rib Riveted to Top of Skin
Getting Ready to Rivet Bottom


After that, remove the -708 rib. Cleco the -706 end rib and -707 nose rib to the skin then cleco -708 back on, then blind rivet. You can't get to the front of this area to hold a bucking bar so you have to put 3 blind rivets in. No bad jokes here about 3 blind mice, I'm punchy enough at this point! :o)  Next, I riveted that -706 end rib to the -702 forward spar. I then riveted the skin to the rest of the ribs. Now, REPEAT all that you just did for the right side skin. Well, it's 9:00 pm and time to watch fireworks so I'll finish the bottom of the right skin riveting to the ribs and spar. I'll pick up here tomorrow.
Ready to Finish Bottom Riveting
HOBBS Meter - 42.9

Thursday, July 5 - I finished the right side bottom of the skin to the ribs and spar. Next, I attached the rear spar assembly to the HS-404, -405, -706 and -601PP skin. There are blind rivets to set on the HS-708 rear spar but you'll do this last, per the directions. I had some more dirll-outs but not many. I had to drill a rivet out that created a figure 8 hole. So, I cut a couple pieces of scrap aluminum and put them on on either side of the damaged spar hole, drilled the new pieces and shaped them to make sure they'd fit the area comortably. I then bucked a new rivet here with the next sized rivet to compensate for the newly added, reinforcement aluminum. Worked like a charm.
Figure 8 Hole Before the fix
The Back Side with Reinforcement

I riveted the skin to the end ribs, HS-706, and inboard ribs, HS-404 and -405. Be careful here, there are 10 rivets that you DO NOT SET. You'll set these later for the faring that will go on the TOP side of the HS. Read the plans and you'll see them. I finished by riveting the skin to the rear spar assembly then pulling the blind rivets (same as a pop rivet) on the HS-708 rib. With that, "Congratulations! You've finished the first major sub-assembly on your new airpane".
Horizontal Stab Complete!

After I turned the HS over, I found an empty rivet hole right smack dab in the middle of the left, bottom skin! AARRGGHHHH! I'll either put a pop rivet (not very likely) there or try to be creative and maybe tape a bucking bar to the end of half a yard stick and slide that in a lightening hole (makes the piece lighter, not like a bolt of lightening, silly) then try to buck it that way. We'll see. Remember the reference of "playing out of hazards" earlier? Well, I think this will be a new trick I can add to my bag of tricks, if I can pull it off. I'll let you know how that goes. Until then, Take Care and Thanks for Reading!
HOBBS Meter - 46.5

Monday, July 2, 2012

First Full Day

Huge day today. This was my first, full project day of over 8 hours. It felt really good to get as much accomplished as I did today. I finished dimpling the horizontal stabilizer (HS) skins. I realized when I finished that I forgot a step in the directions! ARGH!! I hate when that happens! I deburred all the holes in the ribs and spars but forgot to hit the holes in the HS skins. Well, I checked them all and they felt/looked pretty good to me. There were a few that I hit with a debur tool to smooth 'em out. I smoothed all the other parts and even took them across the ScotchBrite (SB) wheel. I even found what appeared to be a little scuff/gouge on the edge of one of the skins. I took it to the SB wheel to remove the offending booger. It turned out ok. This won't be seen later as it is located next to the fuselage and will be covered with a cowling.
Cleanup on a Little Gouge on the HS Skin
The next step is cleaning all the surfaces for priming. I'm using acetone for the cleaning process. I can't seem to locate MEK (methyl ethyl ketone) at any of the DIY stores. Granted, I only checked the big two. It's a good solvent and even used as a plastics adhesive. I think businesses are replacing some solvents with other, safer products. I thought of using denatured alcohol but acetone works pretty well. I'm using gloves to protect my hands (don't want anyone commenting on the safety issues here). I should be using a respirator as well. I'll start using one. So, I got all the parts cleaned and re-marked where the acetone cleaned off the original, part markings. You'll need to make sure you do this so you don't go bonkers with mis-matched holes! You'll also want to make sure that if you can't remember the orientation of the part, take notes. Something like this: on a piece of paper, draw the orientation of the part, something obvious to you so you can't goof it up, e.g., up, down, forward, aft, inboard, or outboard and whether it is to be used on the left or right side. Then, clean the part everwhere the primer is to protect it. Now take your blue Sharpie (recommended by many as they seem to last longer) and mark the part again if you happened to clean the original markings off. I'm basically hanging all my parts from a wire and giving one light coat of primer then after 5-10 minutes, spraying a second heavier coat making sure to cover any exposed aluminum. I read the spray can initially but took particular notice the second time around of the notation about using 320 grit abrasive. This is supposed to prepare the area for better adhesion of the primer. I didn't do this step. I hope I'm ok with the way I've been priming. Of course, if you do this, the steps areas follows: 1) Shake can for 1 minute 2) use SEM solvent to clean the part 3) use 320 grit sandpaper 4) use SEM solvent to clean the part 5) spray 1-3 light coats 6-8" away from the part. That's a lot of steps and time. I'll give the fingernail scratch test to the parts I've primed later to see how they hold up. This primer, SEM, dries pretty quickly. The can says 15 minutes but I've been noticing the parts are drying sooner than that and seem to have a pretty tough coating.
Parts  Clean and Hung, Ready for Primer
Parts Primed with a Couples Coats. Looking Good!
I had forgotten to clean and prime a couple parts as I was ready to start assembling and realized that they were missing from the assembly batch. OOPS! So, I pulled them out, cleaned then primed them and waited for them to dry then I started to assemble them. That little missed step added an extra hour to the process.
Priming the Inside of the HS Skins
Inside Shot of the HS Skin
So, first you tape over a few of the rivet holes as you don't want to inadvertently rivet them without the parts being in place first. Otherwise, you'll be cussing yourself later. These holes are for the hinge brackets and ribs. First you'll rivet the HS-603PP rear spar and HS-609PP spar support bars together. Using the pneumatic rivet squeezer for this process is SO nice! It takes a few rivets to get the setting right on the squeezer for the perfectly set rivet. Next, rivet the HS-412 & -413 hinge brackets to the spar. The directions have me using an AN470AD4-5 rivet for the outboard hinge brackets. I set the first one and it was way too long in my opinion. I went down to a 4-4 and this seemed to be the ticket! so, I had to drill out a total of only 2 rivets. Not bad. I know, with a pneumatic squeezer, you shouldn't have this problem. Well, setting that 4-5 rivet leaned the shop head over (bent it). So, rivet drill-out #1. Then I found where a manufactured head didn't quite set flat. So, rivet drill-out #2. The rest went pretty smoothly. FYI - for the layperson, here's the 411 on a manufactured head and a shop head of a rivet. The manufactured head is the end of the rivet that has a head on it coming from the manufacturer (only one end of the rivet has a head on it before it's set. The shop head is what you end up with after you set a rivet, the mushroomed, flat head on the other end of the rivet when you're done setting it.

Lastly, I bolted the center hinge bearing assembly and torqued the bolts to between 20 and 25 in. lbs. Next is to start on the foward spar assembly.
Our Shop Worker In Process of Riveting
Half Riveted - Tape is NON-Rivet Holes (For Now)
Nice, Pretty Line of Rivets
Rear Spar Completed With Hinge Brackets
That's it for today my peeps. I'm pooped. Hmm, too pooped to peep! I'm getting punchy. Take Care and Thanks for Reading!
HOBBS Meter - 35.3 hrs

Sunday, July 1, 2012

Dimples, Dimples, Dimples

Today, I began the "drill, debur, dimple, repeat" process. There will be a LOT of this throughout the project. I have actually already started the drilling process. I've merely added the lovely and exciting steps of deburring and dimpling and repeating these processes. Basically, I already match-drilled all the spars and ribs to the HS skins. Today I used deburring tools to clean some of the more rough edges of the parts, which I'll put on the ScotchBrite wheel later to give them an even cleaner edge. A ScotchBright wheel is not a grinding stone on the grinder but a softer abrasive wheel. It's like a compacted scrubby shaped like a 6"x1" wheel and attached to a grinder. It does a heckuva job cleaning, polishing and getting rid of rough edges of the manufactured pieces. It's called a Cut & Polish wheel but some builders have given it a more appropriate name, Cut & Bleed wheel. It'll do a number on ya if you're not paying attention. So far (* * * knock on wood), I'm fortunate. I deburred and dimpled the spars and ribs this morning for about an hour.
This is One of the Spars Which has Been Dimpled
Left and Right HS Parts: Ribs, Spars and
Reinforcement Angles
The next task, which has nothing to do with the plane, was to make a jig to install around the DRDT-2 Dimpler. Ok, it DOES have something to do with the plane but not so literally. The mfr gives you plans to build a platform around the dimpler to help support the larger pieces of aluminum, making it easier to dimple the larger sheets. I spent a few hours on fabricating the platform (jig) then had to run to the DIY store for some carpet to put on the bugger. I think it turned out pretty well.
This is One of the Sides of the Jig for the
DRDT-2 Dimpler
Bottom of the One Side Showing the Support Leg
Completed & Installed with Carpet
Then I went in to watch a movie (We Bought A Zoo) with my wifey for a couple hours then back out to the mistress. I've not given her a name yet, so far, just the mistress. Speaking of names, I've been thinking of my tail number for quite some time and have basically narrowed it down to one. It's available right now in the FAA database. I'm just not completely sold on it and want to give it a little more thought. Right now, I'm thinking N763PW (seven six three pappa whiskey). It has a ring to it and the pappa whiskey seems to flow well. It's my birth month and year and my initials. Like I said, I'm not completely sold. My Van's builder number (which is also the serial number for my mistress) is 74092 and doesn't really have anything catchy that I like. I've thought of other things in combination with my wife such as our names, our anniversary, etc., but haven't really come up with but a few ideas that just aren't on the top of the list. So, I'll keep giving it thought. It's much like a vanity plate on your car. It only costs $10 to reserve it through the FAA and about $10 a year to keep it reserved until it's officially yours. The cool thing is once it is given to you, you don't have to pay for it every year like your car tag. Here in California, you pay for the vanity plate every year. It's a recurring cost added to your registration fee.

After the movie, I went out to the ACME garage (Aircraft Construction & Manufacturing Enterprise) for a couple more hours to work on putting the carpet on the jig then I went back to the stabilizer skins. I removed the inside blue plastic on the skins and used a soldering iron to make strips around the skin holes to remove the platic just around the holes. You don't want to remove all the platic because you want to leave as much on as possible to procect the alclad surface from scratches. However, you want to remove the plastic around the holes before dimpling so the plastic doesn't affect the dimpling itself. So, I removed the necessary blue plastic from both HS skins and started dimpling one of the skins. I completed about 1/3 of the dimpling on the first skin. I'll pick up there tomorrow.
Blue Plastic Strips Removed From Around
Skin Drill Holes

The Soldering Iron & Yardstick Used to
Remove the Blue Plastic Around the Skin Holes

That's it for this evening my peeps. Take Care and Thanks for Reading!
HOBBS Meter - 29.3

Saturday, June 30, 2012

Batteries Recharged

Vacation is over, back to work. Boston was the most excellent vacation I've had in quite some time! It was my first time there and I thoroughly enjoyed every minute in while visiting. We returned late Saturday evening and I got a late start Sunday (6/24) after recouping and trying to get everything in order and ready for work.

Sunday, June 24 - I worked on the forward HS spar by match-drilling, dimpling and countersinking the HS-702, -710, and -714 parts. I worked to get the countersink cage set right on a scrap piece of aluminum. I dimpled the spar to mate with the countersunk spar braces. This takes a little finesse to get it just right. You don't want to take too much and it needs to be right so the parts have a really good fit. After all that, I finally pulled the parts together: HS-404, -405, -706, -707 and -708. I fluted all the ribs to get them ready to cleco together, creating the skeletal assembly. I need to finish the fluting (I'm trying to get the hang of this little chore. In time, I'm sure I'll be able to do it blindfolded). Fluting, for the lay person, is where you put small u-shaped bends between the rivet holes in the ribs. This is necessary because when the ribs are stamped at the factory, they end up with a little bend to them. Fluting "pulls" the part back into a flat shape so that the line of rivet holes on the flanges matches the line of rivet holes in the outer skin. You won't always be perfect doing this but you want to get it as close as possible so there's less work involved in getting your clecos in to hold the skin to the skeleton.

While I was on vacation, I received my torque wrench, tight-fit rivet set and my pencil deburring tools from Isham. I'm still waiting for my angle drill set and thin nose yoke that were back-ordered. I'll call them tomorrow and see what's up with the order. The Boston trip wiped me out. I walked about 10-12 miles while there.
HOBBS Meter - 15.0 hrs

Monday, June 25 - I finished preparing the ribs by fluting and checking the straightness of previously fluted ribs. I needed to straighten a few a little more, after having decided that the previous work was done a little late the previous night and may have been rushed a bit. It took me a little while to get the HS-404 and -405 nose and main ribs laid out with the drill holes. Again, measure twice, cut once. Pay close attention here as you drill two holes in the nose rib and two holes in the main rib. Later, you'll attach these and use them as "templates" to drill through the forward spar into the opposite rib and vice versa. Meaning you'll use the -404 rib as template to drill through the spar and -405 rib and the -405 rib as a template to drill through the spar and -404 rib. Clear as mud? You'll see. From the plans, you mark the upper and lower holes on the -405 rib, and the center 2 holes on the -404 rib. Moving on... Anyway, I was finally successful with this little task. It took a little while to interpret the the instructions and make sure I had the right (correct) parts in the correct location. After drilling the -404 and -405 parts, you're tasked with pulling from your inventory HS-706, -707 and -708 (ribs, 2 each) and marking them for left and right parts. Next, take -702 and -603PP, -706, -707 and -708 and cleco the whole shootin' match together. At this point, some holes are not the right size for clecoing in comparison with the part that they are suposed to be cleco'd with. In this case (head scratch, wheels turning, smoke developing), install your cleco from the other direction through the larger hole into the hole sized for your cleco. Took me a few seconds for the bulb to illuminate with this one. You'll match drill these holes next with a #30 bit.
Left Horizontal Spar Substructure
I stopped here after clecoing and before drilling.

HOBBS Meter - 17.3 hrs

Tuesday, June 26 - I drilled the rib and spar attach holes to #30 except the HS-708 and HS-603PP per the plans (because right now, the parts aren't truely lined up and straight). I un-cleco'd, deburred, re-cleco'd then enlarged the HS-708 and -603PP to a #21. I put in the HS-404 and -405 ribs so I could mark the hole locations using the skin rivet holes (for reference on the part). The next step is to pull the parts back out and using the marks you just made for the "approximate hole location", you can flute between the them. After fluting, you draw a centerline down the rib flanges so you know where to line the holes up to the skin holes. Then you clamp the ribs in place. This lessens the chance of having edge distance issues when riveting later. Your ribs will be centerd almost perfectly on your skin holes. Next will be drilling the attach holes in the HS-404 and -405 using the HS-601PP skin as a drill guide. I'll pick up here next.
HOBBS Meter - 19.6

Wednesday, June 27 - I'm mostly match drilling tonight; left horiz. spar and final drilling the HS-404 and -405 nose and main ribs to the HS-601PP skin and getting everything straight. I only got the upper surface drilling completed. I also attached the HS-710  and -714 reinf. angles to get the main intersection fo the -404/-405 ribs, -710 fwd spar and skin together tight, clamped and match drilled. Seems to look a little sloppy to start but as you cleco, everything comes together pretty well. I'm stopping here (noise abatement in the garage after 10:00) and will resume tomorrow.
HOBBS Meter - 21.0

Thursday, June 28 - I completed the left strabilizer by match drilling HS-601PP skin to the rib/spar assembly. I started the right side by duplicating all steps and procedures of the left side (above). I stopped at the point where I am ready to match drill all remaining holes in the skin to a #40. I'll pick up here tomorrow.
HOBBS Meter - 24.0

Friday, June 29 - I completed the right stabilizer by match drilling  HS-601PP skin to the rib/spar assembly. I match drilled the HS-710 and -714 reinf. angles to the fwd spar. At this point, you remove the skin, giving accessibility to match drill the remaining outboard holes in the reinf. angles to the fwd spar. At this point, you disassemble the remaining left and right horiz. stab skeleton (sub-structure) and debur all holes in the ribs and spars. Next will be cleaning all the edges of the spars/ribs then dimpling them along with the skins.

My plan is to try to post at least every other day. Lately, I've been burning the candle at both ends and trying to pack as much in a day as possible, which limits my being able to post before I retire for the evening. We'll see how things go with that. I'll also work on taking lots more pics of the processes for reference and post them along with the dialog to follow along easier. I've been taking them but not the really detailed kind that I really need. Thanks for your patience. Take Care and Thanks for Reading!
HOBBS Meter - 26.5

Saturday, June 16, 2012

Back On Track - Mostly

I left off with the comment that I was going to build the Van's Tool Box project to get back up to speed with riveting. I completed that project and I'm glad I did as I was pretty rusty with my riveting skills. I needed to get the hang of it and get the setting right with the rivet gun. I worked with several riveting techniques including using the pneumatic rivet squeezer (I love this one), bucking by using and getting familiar with all the bars in the tool kit including a tungsten bar, and rivet sets, one being the tight fit (spring loaded) rivet set. I had to send this little gem back because the mechanism was sticking. I'm still waiting for that to come back from Isham, along with my inch-pound torque wrench. The little ball bearing that holds a socket on popped out along with the little, teeny weeny spring. I couldn't get it to stay back in so I sent that back as well.
The Van's Took Box Project - Parts All Layed Out
Tool Box Project - Bottom Riveted and Top Cleco'd
All Complete! Read Directions Very Carefully,
Meaning Read Ahead Sometimes.
It'll Save Some Headache Later.

Sending the Torque Wrench & Tight Fit Rivet Set
Back for Repair or Replacement.

Thurs, May 31 - So, after the tool box was finished, I resumed the HS construction by attaching HS-708 to the rear spar assembly. I Cleco'd the HS-412PP and HS-413PP elevator hinge brackets to the rear spar assembly and match drilled them per the plans. I assembled the elevator hing assembly bracket together and match drilled it as well. I stopped her for the night.

Token Builder Picture
Working the HS Rear Spar Assembly
The VA-146 Hinge Bearing Being Primed
Ok, speaking of priming, I'll give a little dissertation on priming. This is what I researched, discovered and went with. I did a lot of research, what's best, rattle can or 2-part epoxy. I looked at a lot of builder sites as well as EAA forums and VAF. Then I checked my notes and I remembered what Jack Dueck said during the EAA RV Builders Workshop. He's built and flys an RV-4. Here is Jack's take on corrosion protection. Here is a little Bio on Jack and his activities at AirVenture 2012. He's a BIG proponet of rattle-can primers, very easy, effective and no cleanup!

I live in the arid, Antelope Valley in the Mojave Desert of Southern California. It's pretty dry here. I could probably go the route of the GA manufacturers and not prime inside. However, I figure using a rattle-can, self-etching primer is still better than no coat at all and if, down the line, I decide to sell my baby, anybody intetested in having a plane with internal protection will still have that benefit. That said, I'm going with SEM Self-Etching primer. It's a bit costly at $18+ a can. But I understand that I'll be using approximatly a dozen cans for the project. I thought of getting more but the shelf life of the product is only a year so I'll get what I need when I need it. I tried the Rust-O-Leum brand and was disappointed with how it turned out after drying. It dries pretty quickly, is a little heavy when it goes on and a little rough after drying. I tried the SEM on a sample piece of aluminum and was really pleased with the fingernail scratch test. I'm sold. The picture above is of the Rust-O-Leum brand. You'll see pictures later of the SEM brand. I sent an e-mail to Jack confirming the preparation for a project for priming. I inquired about Alumiprep, et al, and Alodine and this is what Jack had to say: "Yes, alumniprep and alodine is overkill.  All you need to do is clean the part with acetone or mek and then spray it with the self etching primer.  Protect yourself during the cleaning process with latex or rubber gloves.  You'll have good results and good corrosion protection.". I understand that even with priming in this manner, you'd be adding between 5 and 10 pounds of weight over all. I can settle for that.

I finished with all the other little projects in the garage, installing the air compressor, air lines, air hose reel, and a little space rearrangement. I pulled the manufacturer drain from the bottom of the air compressor and installed an elbow and extended out a line with a ball valve inline which will be much easier to drain than reaching under to get  to that little 1/4" screw valve. I also installed a RapidAir system for delivering air through the shop. I put a chuck on a manifold near the compressor. The manifold then runs up the wall to the ceiling where it goes in two directions, one to the air hose reel installed on the ceiling and one back to the built in bench/cabinets on the back wall of my garage. I'll have air in 3 convenient locations! ;o) Rapid Air makes a really nice, very simple and easy-to-install system. For $100 and free shipping from various vendors, I highly recommend it! I also installed a 20" fan in the garage to MOVE the still hot air. A breeze is better that nothin'!
HOBBS Meter - 6.5 hrs

RapidAir System Mounted Behind Compressor
Air Hose Reel Ceiling
Mounted & Connected to RapidAir System
End Unit with Chuck for Air at the Workbench
Here is the RapidAir Kit. An Excellent Product!
Aaahhhh, What a Breeze!
Fan From NorthernTool.com
Sat, June 2 - So, let's get back to work. Garage finalized, tool box completed, Let's resume, shall we? I completed the elevator hinge bracket/bearing assembly by riveting the first rivets of the project! I had to drill out the first 2 rivets (successfully I might add) as I didn't apply enough pressure on the manufacturing head which resulted with rivets sitting proud (not seated fully) by about 1/16". I completed riveting then Cleco'd the assembly to the rear HS spar and enlarged the #30 holes to a #12, per the plans.
HOBBS Meter - 7.7 hrs

HS Rear Spar Hinge Bracket Assembly.
Perty Huh? :o)

Tues, June 12 - I marked the HS rear spar parts, disassembled them then started on the HS front spar assembly. I Cleco'd the HS-710 and HS-714 reinforcement angles to the front spar (HS-702) then match drilled per view A-A on the plans.
HOBBS Meter - 9.3 hrs

HS-702 Front Spar with HS-712 & HS714
Cleco'd & Match Drilled
Wed, June 13 - I removed the angles from the front spar and measured and marked them up, cut and filed the ends then added a 6° bend per the plans. This seems like a really slow process with the amount of time spent on this little section. However, I'm taking them to "measure twice, cut once!". I'm just getting ready ready to cut back the HS-702 front spar pieces as these parts are used for and RV-8 and more material needs to be cut away to work for a -7. So, I've marked them up a bit but am going to stop here to give this some thought as to how I'll cut them, i.e., using snips or band saw then clean up. I'm always leary of snips and getting aluminum stuck between the blades and not cutting the part cleanly. However, these are brand new snips and have a really nice edge! I like the bandsaw for cuts but it's limited to the flexibility of the parts movement on the table. I'll sleep on this.
HOBBS Meter - 11.1 hrs

Thurs, June 14, Flag Day! - I worked on the HS-702 front spar. I made the measurements and cut the flanges back per the plans. NOTE TO NEW BUILDERS: READ AHEAD IN THE DIRECTIONS! I didn't read far enough ahead and ASSUMED I had to read the blueprint to follow what was being called out to be trimmed, cut, bent, etc. READ AHEAD A LITTLE TO MAKE SURE YOU'RE DOING EVERYTHING GIVEN TO YOU! If you don't understand what I'm saying here, e-mail me, I'll go into more detail. After all the cuts and everything, the spar parts don't look bad, having not followed the plans and "winging" it. They could be a little cleaner from the aspect of the flanges not being bent out cleanly enough. I thought I had a crack where I had to make the notch relief but after a little filing, it turned out to be ok. After a little more cleanup and priming, they'll probably turn out pretty nice. Next is dimpling the front spar pieces and countersinking the angle parts. I want to be fresh for those steps, particularly countersinking. I will do a little testing before the actual deed to make sure my skills are up to the task. It's been a while since the workshop performing this task as well and it's a new CS cage to get used to.

Marked and Trimming the HS-710 & HS-714 Angles
Now a Little Cleanup

All Pretty Except for a Little ScotchBrite Touchup

After Bends, Cleco'd & Ready for CS & Dimpling
I'm off for Boston tomorrow (Sunday) for a week. My wife has a training seminar there and we're taking the week before her training to do a little sightseeing. I've never been and am really looking forward to the trip for the history and other things the city has to offer.

This post has been a bit long-winded as I'm trying to catch up. I'll try not to get so behind between posts. Once again, Take Care and Thanks for Reading!
HOBBS Meter - 12.6 hrs