Sunday, July 1, 2012

Dimples, Dimples, Dimples

Today, I began the "drill, debur, dimple, repeat" process. There will be a LOT of this throughout the project. I have actually already started the drilling process. I've merely added the lovely and exciting steps of deburring and dimpling and repeating these processes. Basically, I already match-drilled all the spars and ribs to the HS skins. Today I used deburring tools to clean some of the more rough edges of the parts, which I'll put on the ScotchBrite wheel later to give them an even cleaner edge. A ScotchBright wheel is not a grinding stone on the grinder but a softer abrasive wheel. It's like a compacted scrubby shaped like a 6"x1" wheel and attached to a grinder. It does a heckuva job cleaning, polishing and getting rid of rough edges of the manufactured pieces. It's called a Cut & Polish wheel but some builders have given it a more appropriate name, Cut & Bleed wheel. It'll do a number on ya if you're not paying attention. So far (* * * knock on wood), I'm fortunate. I deburred and dimpled the spars and ribs this morning for about an hour.
This is One of the Spars Which has Been Dimpled
Left and Right HS Parts: Ribs, Spars and
Reinforcement Angles
The next task, which has nothing to do with the plane, was to make a jig to install around the DRDT-2 Dimpler. Ok, it DOES have something to do with the plane but not so literally. The mfr gives you plans to build a platform around the dimpler to help support the larger pieces of aluminum, making it easier to dimple the larger sheets. I spent a few hours on fabricating the platform (jig) then had to run to the DIY store for some carpet to put on the bugger. I think it turned out pretty well.
This is One of the Sides of the Jig for the
DRDT-2 Dimpler
Bottom of the One Side Showing the Support Leg
Completed & Installed with Carpet
Then I went in to watch a movie (We Bought A Zoo) with my wifey for a couple hours then back out to the mistress. I've not given her a name yet, so far, just the mistress. Speaking of names, I've been thinking of my tail number for quite some time and have basically narrowed it down to one. It's available right now in the FAA database. I'm just not completely sold on it and want to give it a little more thought. Right now, I'm thinking N763PW (seven six three pappa whiskey). It has a ring to it and the pappa whiskey seems to flow well. It's my birth month and year and my initials. Like I said, I'm not completely sold. My Van's builder number (which is also the serial number for my mistress) is 74092 and doesn't really have anything catchy that I like. I've thought of other things in combination with my wife such as our names, our anniversary, etc., but haven't really come up with but a few ideas that just aren't on the top of the list. So, I'll keep giving it thought. It's much like a vanity plate on your car. It only costs $10 to reserve it through the FAA and about $10 a year to keep it reserved until it's officially yours. The cool thing is once it is given to you, you don't have to pay for it every year like your car tag. Here in California, you pay for the vanity plate every year. It's a recurring cost added to your registration fee.

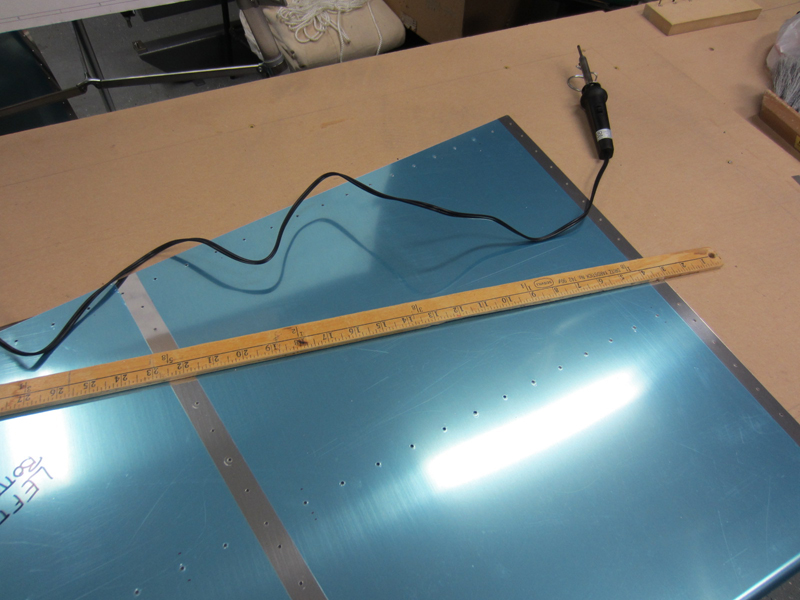
After the movie, I went out to the ACME garage (Aircraft Construction & Manufacturing Enterprise) for a couple more hours to work on putting the carpet on the jig then I went back to the stabilizer skins. I removed the inside blue plastic on the skins and used a soldering iron to make strips around the skin holes to remove the platic just around the holes. You don't want to remove all the platic because you want to leave as much on as possible to procect the alclad surface from scratches. However, you want to remove the plastic around the holes before dimpling so the plastic doesn't affect the dimpling itself. So, I removed the necessary blue plastic from both HS skins and started dimpling one of the skins. I completed about 1/3 of the dimpling on the first skin. I'll pick up there tomorrow.
Blue Plastic Strips Removed From Around
Skin Drill Holes

The Soldering Iron & Yardstick Used to
Remove the Blue Plastic Around the Skin Holes

That's it for this evening my peeps. Take Care and Thanks for Reading!
HOBBS Meter - 29.3

Saturday, June 30, 2012

Batteries Recharged

Vacation is over, back to work. Boston was the most excellent vacation I've had in quite some time! It was my first time there and I thoroughly enjoyed every minute in while visiting. We returned late Saturday evening and I got a late start Sunday (6/24) after recouping and trying to get everything in order and ready for work.

Sunday, June 24 - I worked on the forward HS spar by match-drilling, dimpling and countersinking the HS-702, -710, and -714 parts. I worked to get the countersink cage set right on a scrap piece of aluminum. I dimpled the spar to mate with the countersunk spar braces. This takes a little finesse to get it just right. You don't want to take too much and it needs to be right so the parts have a really good fit. After all that, I finally pulled the parts together: HS-404, -405, -706, -707 and -708. I fluted all the ribs to get them ready to cleco together, creating the skeletal assembly. I need to finish the fluting (I'm trying to get the hang of this little chore. In time, I'm sure I'll be able to do it blindfolded). Fluting, for the lay person, is where you put small u-shaped bends between the rivet holes in the ribs. This is necessary because when the ribs are stamped at the factory, they end up with a little bend to them. Fluting "pulls" the part back into a flat shape so that the line of rivet holes on the flanges matches the line of rivet holes in the outer skin. You won't always be perfect doing this but you want to get it as close as possible so there's less work involved in getting your clecos in to hold the skin to the skeleton.

While I was on vacation, I received my torque wrench, tight-fit rivet set and my pencil deburring tools from Isham. I'm still waiting for my angle drill set and thin nose yoke that were back-ordered. I'll call them tomorrow and see what's up with the order. The Boston trip wiped me out. I walked about 10-12 miles while there.
HOBBS Meter - 15.0 hrs

Monday, June 25 - I finished preparing the ribs by fluting and checking the straightness of previously fluted ribs. I needed to straighten a few a little more, after having decided that the previous work was done a little late the previous night and may have been rushed a bit. It took me a little while to get the HS-404 and -405 nose and main ribs laid out with the drill holes. Again, measure twice, cut once. Pay close attention here as you drill two holes in the nose rib and two holes in the main rib. Later, you'll attach these and use them as "templates" to drill through the forward spar into the opposite rib and vice versa. Meaning you'll use the -404 rib as template to drill through the spar and -405 rib and the -405 rib as a template to drill through the spar and -404 rib. Clear as mud? You'll see. From the plans, you mark the upper and lower holes on the -405 rib, and the center 2 holes on the -404 rib. Moving on... Anyway, I was finally successful with this little task. It took a little while to interpret the the instructions and make sure I had the right (correct) parts in the correct location. After drilling the -404 and -405 parts, you're tasked with pulling from your inventory HS-706, -707 and -708 (ribs, 2 each) and marking them for left and right parts. Next, take -702 and -603PP, -706, -707 and -708 and cleco the whole shootin' match together. At this point, some holes are not the right size for clecoing in comparison with the part that they are suposed to be cleco'd with. In this case (head scratch, wheels turning, smoke developing), install your cleco from the other direction through the larger hole into the hole sized for your cleco. Took me a few seconds for the bulb to illuminate with this one. You'll match drill these holes next with a #30 bit.
Left Horizontal Spar Substructure
I stopped here after clecoing and before drilling.

HOBBS Meter - 17.3 hrs

Tuesday, June 26 - I drilled the rib and spar attach holes to #30 except the HS-708 and HS-603PP per the plans (because right now, the parts aren't truely lined up and straight). I un-cleco'd, deburred, re-cleco'd then enlarged the HS-708 and -603PP to a #21. I put in the HS-404 and -405 ribs so I could mark the hole locations using the skin rivet holes (for reference on the part). The next step is to pull the parts back out and using the marks you just made for the "approximate hole location", you can flute between the them. After fluting, you draw a centerline down the rib flanges so you know where to line the holes up to the skin holes. Then you clamp the ribs in place. This lessens the chance of having edge distance issues when riveting later. Your ribs will be centerd almost perfectly on your skin holes. Next will be drilling the attach holes in the HS-404 and -405 using the HS-601PP skin as a drill guide. I'll pick up here next.
HOBBS Meter - 19.6

Wednesday, June 27 - I'm mostly match drilling tonight; left horiz. spar and final drilling the HS-404 and -405 nose and main ribs to the HS-601PP skin and getting everything straight. I only got the upper surface drilling completed. I also attached the HS-710  and -714 reinf. angles to get the main intersection fo the -404/-405 ribs, -710 fwd spar and skin together tight, clamped and match drilled. Seems to look a little sloppy to start but as you cleco, everything comes together pretty well. I'm stopping here (noise abatement in the garage after 10:00) and will resume tomorrow.
HOBBS Meter - 21.0

Thursday, June 28 - I completed the left strabilizer by match drilling HS-601PP skin to the rib/spar assembly. I started the right side by duplicating all steps and procedures of the left side (above). I stopped at the point where I am ready to match drill all remaining holes in the skin to a #40. I'll pick up here tomorrow.
HOBBS Meter - 24.0

Friday, June 29 - I completed the right stabilizer by match drilling  HS-601PP skin to the rib/spar assembly. I match drilled the HS-710 and -714 reinf. angles to the fwd spar. At this point, you remove the skin, giving accessibility to match drill the remaining outboard holes in the reinf. angles to the fwd spar. At this point, you disassemble the remaining left and right horiz. stab skeleton (sub-structure) and debur all holes in the ribs and spars. Next will be cleaning all the edges of the spars/ribs then dimpling them along with the skins.

My plan is to try to post at least every other day. Lately, I've been burning the candle at both ends and trying to pack as much in a day as possible, which limits my being able to post before I retire for the evening. We'll see how things go with that. I'll also work on taking lots more pics of the processes for reference and post them along with the dialog to follow along easier. I've been taking them but not the really detailed kind that I really need. Thanks for your patience. Take Care and Thanks for Reading!
HOBBS Meter - 26.5

Saturday, June 16, 2012

Back On Track - Mostly

I left off with the comment that I was going to build the Van's Tool Box project to get back up to speed with riveting. I completed that project and I'm glad I did as I was pretty rusty with my riveting skills. I needed to get the hang of it and get the setting right with the rivet gun. I worked with several riveting techniques including using the pneumatic rivet squeezer (I love this one), bucking by using and getting familiar with all the bars in the tool kit including a tungsten bar, and rivet sets, one being the tight fit (spring loaded) rivet set. I had to send this little gem back because the mechanism was sticking. I'm still waiting for that to come back from Isham, along with my inch-pound torque wrench. The little ball bearing that holds a socket on popped out along with the little, teeny weeny spring. I couldn't get it to stay back in so I sent that back as well.
The Van's Took Box Project - Parts All Layed Out
Tool Box Project - Bottom Riveted and Top Cleco'd
All Complete! Read Directions Very Carefully,
Meaning Read Ahead Sometimes.
It'll Save Some Headache Later.

Sending the Torque Wrench & Tight Fit Rivet Set
Back for Repair or Replacement.

Thurs, May 31 - So, after the tool box was finished, I resumed the HS construction by attaching HS-708 to the rear spar assembly. I Cleco'd the HS-412PP and HS-413PP elevator hinge brackets to the rear spar assembly and match drilled them per the plans. I assembled the elevator hing assembly bracket together and match drilled it as well. I stopped her for the night.

Token Builder Picture
Working the HS Rear Spar Assembly
The VA-146 Hinge Bearing Being Primed
Ok, speaking of priming, I'll give a little dissertation on priming. This is what I researched, discovered and went with. I did a lot of research, what's best, rattle can or 2-part epoxy. I looked at a lot of builder sites as well as EAA forums and VAF. Then I checked my notes and I remembered what Jack Dueck said during the EAA RV Builders Workshop. He's built and flys an RV-4. Here is Jack's take on corrosion protection. Here is a little Bio on Jack and his activities at AirVenture 2012. He's a BIG proponet of rattle-can primers, very easy, effective and no cleanup!

I live in the arid, Antelope Valley in the Mojave Desert of Southern California. It's pretty dry here. I could probably go the route of the GA manufacturers and not prime inside. However, I figure using a rattle-can, self-etching primer is still better than no coat at all and if, down the line, I decide to sell my baby, anybody intetested in having a plane with internal protection will still have that benefit. That said, I'm going with SEM Self-Etching primer. It's a bit costly at $18+ a can. But I understand that I'll be using approximatly a dozen cans for the project. I thought of getting more but the shelf life of the product is only a year so I'll get what I need when I need it. I tried the Rust-O-Leum brand and was disappointed with how it turned out after drying. It dries pretty quickly, is a little heavy when it goes on and a little rough after drying. I tried the SEM on a sample piece of aluminum and was really pleased with the fingernail scratch test. I'm sold. The picture above is of the Rust-O-Leum brand. You'll see pictures later of the SEM brand. I sent an e-mail to Jack confirming the preparation for a project for priming. I inquired about Alumiprep, et al, and Alodine and this is what Jack had to say: "Yes, alumniprep and alodine is overkill.  All you need to do is clean the part with acetone or mek and then spray it with the self etching primer.  Protect yourself during the cleaning process with latex or rubber gloves.  You'll have good results and good corrosion protection.". I understand that even with priming in this manner, you'd be adding between 5 and 10 pounds of weight over all. I can settle for that.

I finished with all the other little projects in the garage, installing the air compressor, air lines, air hose reel, and a little space rearrangement. I pulled the manufacturer drain from the bottom of the air compressor and installed an elbow and extended out a line with a ball valve inline which will be much easier to drain than reaching under to get  to that little 1/4" screw valve. I also installed a RapidAir system for delivering air through the shop. I put a chuck on a manifold near the compressor. The manifold then runs up the wall to the ceiling where it goes in two directions, one to the air hose reel installed on the ceiling and one back to the built in bench/cabinets on the back wall of my garage. I'll have air in 3 convenient locations! ;o) Rapid Air makes a really nice, very simple and easy-to-install system. For $100 and free shipping from various vendors, I highly recommend it! I also installed a 20" fan in the garage to MOVE the still hot air. A breeze is better that nothin'!
HOBBS Meter - 6.5 hrs

RapidAir System Mounted Behind Compressor
Air Hose Reel Ceiling
Mounted & Connected to RapidAir System
End Unit with Chuck for Air at the Workbench
Here is the RapidAir Kit. An Excellent Product!
Aaahhhh, What a Breeze!
Fan From NorthernTool.com
Sat, June 2 - So, let's get back to work. Garage finalized, tool box completed, Let's resume, shall we? I completed the elevator hinge bracket/bearing assembly by riveting the first rivets of the project! I had to drill out the first 2 rivets (successfully I might add) as I didn't apply enough pressure on the manufacturing head which resulted with rivets sitting proud (not seated fully) by about 1/16". I completed riveting then Cleco'd the assembly to the rear HS spar and enlarged the #30 holes to a #12, per the plans.
HOBBS Meter - 7.7 hrs

HS Rear Spar Hinge Bracket Assembly.
Perty Huh? :o)

Tues, June 12 - I marked the HS rear spar parts, disassembled them then started on the HS front spar assembly. I Cleco'd the HS-710 and HS-714 reinforcement angles to the front spar (HS-702) then match drilled per view A-A on the plans.
HOBBS Meter - 9.3 hrs

HS-702 Front Spar with HS-712 & HS714
Cleco'd & Match Drilled
Wed, June 13 - I removed the angles from the front spar and measured and marked them up, cut and filed the ends then added a 6° bend per the plans. This seems like a really slow process with the amount of time spent on this little section. However, I'm taking them to "measure twice, cut once!". I'm just getting ready ready to cut back the HS-702 front spar pieces as these parts are used for and RV-8 and more material needs to be cut away to work for a -7. So, I've marked them up a bit but am going to stop here to give this some thought as to how I'll cut them, i.e., using snips or band saw then clean up. I'm always leary of snips and getting aluminum stuck between the blades and not cutting the part cleanly. However, these are brand new snips and have a really nice edge! I like the bandsaw for cuts but it's limited to the flexibility of the parts movement on the table. I'll sleep on this.
HOBBS Meter - 11.1 hrs

Thurs, June 14, Flag Day! - I worked on the HS-702 front spar. I made the measurements and cut the flanges back per the plans. NOTE TO NEW BUILDERS: READ AHEAD IN THE DIRECTIONS! I didn't read far enough ahead and ASSUMED I had to read the blueprint to follow what was being called out to be trimmed, cut, bent, etc. READ AHEAD A LITTLE TO MAKE SURE YOU'RE DOING EVERYTHING GIVEN TO YOU! If you don't understand what I'm saying here, e-mail me, I'll go into more detail. After all the cuts and everything, the spar parts don't look bad, having not followed the plans and "winging" it. They could be a little cleaner from the aspect of the flanges not being bent out cleanly enough. I thought I had a crack where I had to make the notch relief but after a little filing, it turned out to be ok. After a little more cleanup and priming, they'll probably turn out pretty nice. Next is dimpling the front spar pieces and countersinking the angle parts. I want to be fresh for those steps, particularly countersinking. I will do a little testing before the actual deed to make sure my skills are up to the task. It's been a while since the workshop performing this task as well and it's a new CS cage to get used to.

Marked and Trimming the HS-710 & HS-714 Angles
Now a Little Cleanup

All Pretty Except for a Little ScotchBrite Touchup

After Bends, Cleco'd & Ready for CS & Dimpling
I'm off for Boston tomorrow (Sunday) for a week. My wife has a training seminar there and we're taking the week before her training to do a little sightseeing. I've never been and am really looking forward to the trip for the history and other things the city has to offer.

This post has been a bit long-winded as I'm trying to catch up. I'll try not to get so behind between posts. Once again, Take Care and Thanks for Reading!
HOBBS Meter - 12.6 hrs

Saturday, May 26, 2012

Moving On

Things are looking up! Though I'm still pretty pissed about my major brain fart with dropping the compressor, I've accepted it and am moving on. I have been researching the replacement of the motor and flywheel. The motor and flywheel together pretty closely come to the cost I paid for the compressor to begin with. I ended up calling US Equipment Company, which is south of me about 90 minutes. I spoke with Eddie in the parts department and he said he doesn't have a replacment motor in stock (seems nobody else does either) but that the cost for it would be $459. YIKES!!! The flywheel is a moderate $121. That's $580 to fix this thing. He said he thought he had a new compressor that he would give me for $712. Turns out that it's a 3hp compressor (SS3L3). I have a 5hp compressor (SS5L5). I said that the cost of a new compressor is pretty damn close to the cost of just the couple replacement parts. He agreed. Their company is moving it's location and he finally talked me into taking the SS3L3 (3hp) compressor. He's giving it to me out the door for $646!!! I'll Take it! They don't want to have to incur the cost to relocate it to their new warehouse. It's brand new, unwraped from the factory. He said it would cost him the same either way by shipping it to their new location or me so I got a nice deal. Thanks Eddie! I'll take my time reparing the other one and resell it later down the road. So, if anyone is interested, let me know. I don't have a clue what shipping for it would be but just figure what it would cost sending a 450lb unit via freight.

Yesterday saw the arrival of my tool kit from Isham as well as my bench belt/disc sander. I inventoried the tool kit and there are a couple things back-ordered a week. No worries, don't need them right now. Quite a complete kit, I must say. One of the extras I purchased was an in.-lb. torque wrench. Just imagine, except for the air compressor, this kit includes almost all the tools you'll need to build your plane, which come in a 65lb box. *WHEW* I think the bucking bars and Clecos weigh half that! I looked at Sears for a belt/disc sander and thought they wanted too much for it. So I went to NorthernTool to check them out and found they had basically the same item for $40 less than Sears. At Northern, they're sold as Klutch. It's identical to the Craftsman brand except the Klutch item doesn't have the word CRAFTSMAN emblazoned on the table. I physically looked at the Craftsman sander today and yes, they are identical.

I have a small air compressor, a Harbor Freight 5 gal, 2hp compressor that I've had for the last 15 years. It's been a little trooper. It still holds up to the small jobs. Tonight, the empennage was finally started. I began with the HS-609PP rear spar reinforcement bars and HS-603PP rear spars. I cleaned up the edges on the bars, Cleco'd them into the rear spars and match drilled with a #30 bit using my little workhorse compressor.
Beginning the Horizontal Stab Rear Spar
I stopped here as I remembered I want to build my Van's tool box and the sheet metal training project from the builder's workshop. The training project is also available at Van's. I want to work on these two to hone my riveting skills. I haven't done any riveting since the workshop back in October 2011. I'm sure I'm a bit rusty and want to start off doing this project right the first time. So, the Cleco'd and drilled HS rear spar will be something to look at as the start of good and FUN things to come! I'd much rather have the new compressor in place and ready to go anyway as it will definitely be better up to the task of drilling and riveting than my little guy.

Well Folks, that's it for now. I'll check in with ya later! Take Care and Thanks For Reading!
HOBBS Meter 3.0 hrs

Isham Tool Kit
Another Item for the Power Tools Table!!
The Finished Tool Table, Vacuum Included.
They All Connect to One Power Strip.
I also purchased a new tool chest combo from Sears today. They're having a 50% off sale on some of them for the Memorial Day weekend. What a steal! I got a 9-drawer, 2-piece combo for $269 +tax. It's regularly $540. It was a good day.

Wednesday, May 23, 2012

First Big OOPS!

More things are being delivered. This Monday, I received my DRDT-2 dimpler! I was actually surprised by this one. They were able to deliver without signature which is always nice. I dislike having to grab the door tag and drive to pick up my stuff and try to hit the location in a 30 minute window. It's quite aggrivating. I could always tell them to hold and not send out for delivery and just take my tracking number and pick things up that way. We'll see how things go further down the road. I expected this to be delivered with my tools. However, these are usually ordered and have a 2 week lead time and are shipped at the same time as your tools but from the manufacturer. My mistake. Arizona is a lot closer than Kansas so it figures that this would come a little earlier.
DRDT-2 Dimpler from Isham (PlaneTools.com)
This dimpler will make things go much more quickly and relieve the hands of cramping and getting very sore and blistered by not having to use a hand squeezer. This is one heavy piece of equipment. I've seen a lot of others users build a neat little table for this gem. I always wondered where they were getting the idea for the table setup. Turns out there are plans for the table that come with the instuctions and dimpler! Wahooo!! That's a no-brainer! I love those. That'll keep me busy this weekend along with building a little frame for the plans.
Yesterday (Tuesday) was not a real good day. My air compressor shipped from Kentucky last Friday, the 18th. I was told by NorthernTool that I would get a call from the freight company (who, at this point, shall remain nameless) a day before delivery so I could make arrangements to pick it up from the curb and get it into my garage. I had to work late supporting a conference and was not able to have my phone with me at the time. I worked until 5pm which made me late for a 5:00 appointment. When I finally got finished with my support role, I called my appointment and said I'd be there by 5:30. "No worries, you're set!" Ahh, ok, scramble back to my office, log off my computer, grab my phone and throw it in the backpack and get outta Dodge! I'm racing to my appointment, get there just before 5:30 and as I'm pulling up, my wife calls me with news that there is an air compressor sitting on the side of my garage. WHAT?! Turns out my sis-n-law signed for the compressor. Nobody knew it was coming. It was a complete surprise!
Ingersoll-Rand SS5L5 Air Compressor. Ship wieght - 450 lbs.
After I get home, I get the whole story and realize that the driver had called my cell at 4:15pm!! "Hey, this is Eddie! I'll be here 5 minutes then I'm leaving. There is nobody here to sign for this." Sis-n-law just happens to drive up when he's walking back to his truck. Ahh, just in time! Well, I had paid to have it liftgated off the truck and left at curbside where it would be MY responsibility to get it to the garage. I guess he figured he was helping a lady out so they tried to move it by pallet jack INTO the garage, where I had not made room just yet for it. Well, don't bother, the compressor stands 6' high and sits on a 6" pallet! my garage opening is just 78" and the rise of the pallet jack added just enough that they couldn't get it in, so he left it on the side of the garage. Now, the fun part! I decide to unwind a bit after work from being so hurried. I changed into some shorts and a t-shirt and sat down for a little dinner. Take my time, relax, patience (remember my discussion last post on patience?). I finish dinner, grab a soda, go outside. I start with removing the plastic protective sheeting then unbolt the feet from the pallet. I had thought to ask wife and sis-n-law for some assistance to move it into the garage. I had originally planned to have a couple guys over and snag a pallet jack from work temporarily to move this beast, had I been alerted ahead of time! This thing weighs in around 450 lbs. and is very top heavy. I figured I could rock it carefully off the pallet and have things ready for the girls to assist. Well, my first big OOPS! I rocked it one way, then another to get a feel for it. Ok, ready. I make a big swing to get a foot over to another slat on the pallet, then start to let it sit back on all three feet. It kept going. Why isn't this thing stopping? What the hell? I can't catch it and it falls backward, on the belt wheel and the motor. DAMMIT! Seriously?!? Ok, what am I going to do? This thing is like lifting dead weight and 80% of its weight is on top. I'm a pretty talented guy when it comes to moving things around and pretty creative with getting things out of a bind. Not this time. I could NOT do this by myself. I had to throw in the towel.
My First Big OOPS!
THAT will Leave a Mark!

I swallowed my pride, went into the house and confessed. Repeat after me: I NEED HELP! Remember this phrase. The ladies came out and helped me get Big Bertha upright. With the assistance I should have had to begin with, they helped me to get it into the garage. Now, repair time. I need to replace the motor or get the motor housing fixed. The fall pushed the shaft of the motor through the other side, breaking the housing. The belt pully on the pump broke and came off as well. All the fins broke both at the hub and where they connect to the wheel. I'm hoping that because the way this thing fell, the pump is ok. We'll see. I'm keeping my fingers crossed with this one. So, I'm in the process of getting assitance through NorthernTool, working with Ingersoll to see what "we" can do. I'll keep you posted.

Ordinarily, I would not post such a humiliating event. However, I'm posting Lessons Learned and will continue to do so throughout my project. At my company, lessons learned is a popular buzz phrase. It's our responsibility to alert others of the things we learn by mistake to help to keep things like this from happening and to improve processes which help in many ways. What was I thinking? What's one of the signs of a hazardous attidude? MACHO.. you got it! I can do this!! Well, I was wrong friends very wrong. Please, PLEASE, PLEASE, if you need help, ask for it. It should NOT be beneath any of us to request assistance. Don't be embarrased. We are adults. KNOW YOUR LIMITATIONS. Nobody will laugh at you. If they do, show them this post. I'm extremely lucky that I wasn't on the other end of this behemoth to sustain major injury. As a pilot, I feel I'm very safe. We can always be safer though. On the ground however, I take a risk or two, here and there. Well, the picture above shows what can and what DID happen.

I hope this valuable lesson serves you well. If nothing else, I hope I planted a little seed in your noggin so that when you come to a point in your build or doing anything else in your life, you'll stop and think about it. Maybe you'll remember this little picture and think to yourself, I'd better get help. Maybe I should wait. Please do. You'll be happy you did.

Take care my friends and Thanks For Reading!

Friday, May 18, 2012

Let the Building Begin!

Finally! Yes, I'm catching up after what seems like MONTHS of not posting. Well, it's only been since March. Things have finally gotten over the hurdles and I am moving forward. I've been waiting for funds to fall into place and it's been one delay after another. Tax refund took longer to deposit (3 weeks instead of 1). A loan I paid off took longer to actually pay off then expected (2 weeks). Then after loan payoff, I had to wait an additional 30 days to borrow again (a little confusing, I know). Now the fun stuff!

I ordered my empennage and wing kits at the same time. May 2, I was asked to snail-mail my order (not sure if this is normal) as I had a discount certificate to submit. I put a rush, 2-day delivery on that letter and it didn't get opened until 2 days after that! Delay, delay, delay. I've learned a very valuable lesson from all this ...  P A T I E N C E ! ! ! This is the first of many parts of the project that requires patience. Don't MAKE it happen, LET it happen. Hmm, did I just come up with a new quote? I'm sure someone somewhere has said those very words. I digress. I ordered the RV-7A kit with the Electric Elevator Trim Kit option and the Capacitive Fuel Sending Units option. The neat thing about the latter is there are no moving parts and they are much more accurate the the float-type sending units. I've ordered the slow build kit as I want to experience the entire process from the ground up. That's the cool part of the Experimental prospect of "learning". :P

After the Van's order, I placed my order for my air compressor. Now, I've been doing a lot of research on this as to what is enough, what's not enough and what's overkill and a waste of money. I inquired of my buddy Ron Duren about his Home Depot Husky compressor. He said he's been very happy with his purchase and if he was given the chance, he'd do it again. I studied that and others in the range but decided I was going to move up in the chain. The thought on this is that someday, I plan to paint the outside of my house and more tank is better. So, this will work for the entire RV project and everything else in my life. That said, I settled on an Ingersoll-Rand air compressor from NorthernTool.com. FREE SHIPPING! I have to wait a couple weeks as it's coming from the factory. It should arrive the week of the 21st along with my tools.

I orderd my Isham tool kit from PlaneTools.com which should arrive the same week as the compressor (hopefully). I'm pretty happy with everything you get for the money, the LIFETIME GUARANTEE in addition to the 2 particular tools included in the kit; the DRDT-2 dimpler and the pneumatic rivet squeezer. These two tools alone will save countless hours and muscle fatigue. I ordered a couple other things in addition to the standard RV tool kit; a 0-600 in.lb. torque wrench and a sheet metal nibbler. I also added a few things to the tool kit which are options such as additional Clecos, bucking bars, yokes for the rivet squeezer and extra drill bits. Sometimes I have a habit of breaking bits so I doubled that order.

The other tools I've been acquiring are a bandsaw, bench grinder, bench sander (belt/disc) to add to the drill press and bench vice I've already got. I built an additional, smaller, roll-around bench to accommodate all those mounted tools. I'm not happy with the height as I made the normal height table from the EAA Chapter 1000 plans and then added 3" locking caster wheels. Now the bench is a little high. I'm considering shaving the legs down a bit to accommodate the added height, maybe... um.. about... 3" or so. That sound about right? That's if my math is correct. I might have to get one of those scientific calculators those engineer-types use. ;)

Well, my emp kit arrived this past Monday, the 14th, before FedUp left a tag on the door requiring attendance & a signature. I arrived home too late that day to take the tag to the distribution center. The *bleeping* driver didn't leave a time on the tag so I had to call about the attempted delivery time... 12:45. Got it! The next day I went home for lunch at 12:00 in hopes I'd catch him this day. I arrived at the house at 12:15. DAMMIT! Another tag on the door, attempt #2!!! I called and found out this attempt was at 11:30! Seriously!?!? Can I NOT catch a break here? Oh yeah... oooohhhhhmmmmm  .. PATIENCE! Ok, I'll get to the distribution center to pick it up this time! ARGH! NEXT time, I'll plan ahead and have the packages that are on the little truck held at the distribution center and I'll get them myself. Unfortunately, Van's didn't send me an e-mail with a confirmation/tracking number so I would expect something. I'll talk to them next time. The wings will come in about 7 weeks and they'll be on the BIG truck, because they're real heavy, 2 crates at about 200 lbs each!! Ahh, I can't wait!


I've been getting the shop cleaned up, re-organized and workbenches built. I moved the Cooper to the outside elements so I'll have room to build. The first kit will only require 1 part of the 3-car garage. As soon as space starts filling up with parts, I'll kick another car to the curb so I can spread my wings! Uh, get it? :) Here are some pics of during and after. You saw earlier of the before. It's still a work in progress as I won't know how the space provided will work until I get started.
The Cooper is Out. Starting the Cleaning,
Organizing and Straightening Process
EAA Chapter 1000 Work Tables in Progress
Completed Work Tables
I Added the Drop-Down Wheels for Better
Movement of the Tables Around the Shop


My Rivet Back Plate. It Measures 14"x24"x3/8".
Got it at a Local Metal Shop for $35!


The Smaller, Roll-Around Table
with Benchtop Tools Mounted


WAHOOO! Parts Arrive. All the Builders Like
This Print on the Box. FedUp Guys Are
Always Curious :)  "A Real Airplane?"

There It Is!
The First Builder Pic of the Project

Handsome Devil!

Like a Jack-in-the-Box, the Spring is Released!
It's so Cool to Finally Have Your Own Parts
to Touch and Feel!

More Parts, Inventoried and All Accounted For
And the Glue (Rivets & Hardware)
That Bind Everything Together

Ok! So let's get those tools in and get some parts drilled, deburred, cleaned, primed, riveted and assembled!

Thanks for all your patience my Peeps! I'm sorry things got so stale here looking at a site that seemed to be going nowhere. The brakes have been released and the gas ever-so-gently applied. Onward. What's the word of the day Kids? P A T I E N C E !  A little goes a long way. Whenever things aren't going quite your way, stop, step back, close your eyes, take a deep breath and slooowwwly let it out. Count to 10. Heck, count to 30 if it helps but ... don't rush! Take your time and be patient.

Take Care and Thanks For Reading!
HOBBS Meter - 3.0 hrs 

Tuesday, March 6, 2012

The Waiting Game

I know, I know, I said I'd be making more regular posts. However, it's been a waiting game for the Feds to give my refund to me and then paying off bills to enable me to make all the purchases I need; tools, equipment, EMPENNAGE! So, I expect that I will definitely be ordering all my goods in April. I apologize for my tardiness yet again.

In the meantime, I've done a few things to prepare. I've been doing a lot of research on air compressors. So, how much should I spend? Single- or two-stage compressor? 60 gallons? 80 gallons? I've seen the gammut for everything from 20 gallon to 80 gallon compressors. I usually don't like buying my "quality" equipment from Harbor Freight but in this case, I'm considering a two-stage, 60 gallon, 5 hp for their current sale price of $799. It's made by U.S. General. I was considering an Ingersoll-Rand for $400 more but can I justify the price? I've seen reviews go all over the page, high and low with both. If anyone has any weigh-in on this subject, please, indulge me. I've been vacilating for a while on this decision. I can afford the $400 but again, is it justified? I could certainly put those clam$ towards something else.

Ok, I've mentioned before that I'm going with Plane Tools' RV tool kit. Hey, how can you go wrong with a kit from a company that gives 100% lifetime warranty on 95% of the items in the kit?! No, the drill bits and Scotch Brite wheel and pads are NOT warranted! I'll be getting a few extra goodies as well, such as: accordian fan, 0-600 in lb torque wrench, sheet metal nibbler, flush swivel rivet set, longeron yoke, 4" thin nose yoke, 37° tubing flare tool, tubing bender, tight fit dril kit, tungsten bar and the RV-10 option which includes more Clecos so I can avoid having to get more later. I'll probably call Plane Tools before I order to make sure I'm not doubling something inadvertently and ask about a couple other things. I've been looking around for rivet backing plates and I can't see spending what is asked (typically about $65 for a 3/8"x4"x15") for these smaller plates that some merchants offer. I stopped into a local steel supplier and they quoted roughly $100 for a 1/2"x12"x24" piece of cold rolled steel plate. It's still cheaper in the long run. Still, I'll be checking a few other places to see what I can find. If you're wondering about the cold rolled steel, it's supposed to have a smoother finish over all compared to hot rolled. I'd prefer that especially when laying skins against the surface. I'll probably tape the surface anyway for protection but still...

A month ago or so I bought the amateur builder kit from EAA for about $13. It has everything you need to get started. It lets you know all about the certification process. It has a step-by-step certification guide, all the forms you'll eventually need and information about reserving your N number. It also includes an EXPERIMENTAL sticker as well as panel and other stickers you can use for labeling. It also has a MFR plate. If you're a member it's $13 and about 20 bucks for non-members.


I'm also enrolled in a private pilot ground school. I don't have much stick time as a pilot and could always use a refresher. "A Good pilot is always learning". The cool thing is they're doing this through my employer FREE! I already have the books so I'm just going to sit in and listen to several instructors cover everything from A-Z through a 9-week couse, 1 night a week for 3 hours. I'm looking forward to it! At the kickoff meeting we went around the room and introduced ourselves and I mentioned that I'm going to build an RV-7A and got razzed for not going with a tail-wheel by a couple of the instructors. Geez! We'll see. Right now, I'm set on an A but who knows.

That's it for now folks. Thanks for your patience and comments. Stay tuned. I'll get this thing going soon! I can't wait! In the meantime, more research and looking for inexpensive goods and continue setting up shop. :) KPR! Take Care and Thanks For Reading!